

OpenAI Customer Service Agent Demo
OpenAI released a GitHub repository containing a demo of a Customer Service Agent interface.

The interface consist of a back-end and web front-end, built on top of the OpenAI Agents SDK.
The two parts:
A python backend that handles the agent orchestration logic, implementing the Agents SDK customer service example
A Next.js UI allowing the visualisation of the agent orchestration process and providing a chat interface.
LTDR
The GitHub repository demonstrates a customer service AI Agent for airlines, built with OpenAI’s Agents SDK.
The development shows how five AI Agents collaborate with a Triage Agent distributing tasks between four sub-agents.
Two guardrails are in place, checking for relevance and jailbreaking.
Conversation context and memory are also managed.
The aim of OpenAI with this project is to serve as a reference showcasing what can be built using the OpenAI SDK.
Introduction
The openai-cs-agents-demo repository on GitHub offers a practical look at how AI can enhance customer service, particularly for airlines.
In this blog post will explore what the demo entails, its key features, and why it matters for the future of AI in service industries.
What the Repository Offers
This demo, created by OpenAI, simulates a customer service scenario for airlines. It includes a Python backend for managing agent logic and a Next.js UI for user interaction.
The system handles common tasks like changing seats, canceling flights, checking flight status, and answering FAQs, making it a valuable tool for understanding Agentic applications.
Key Features & Functionality
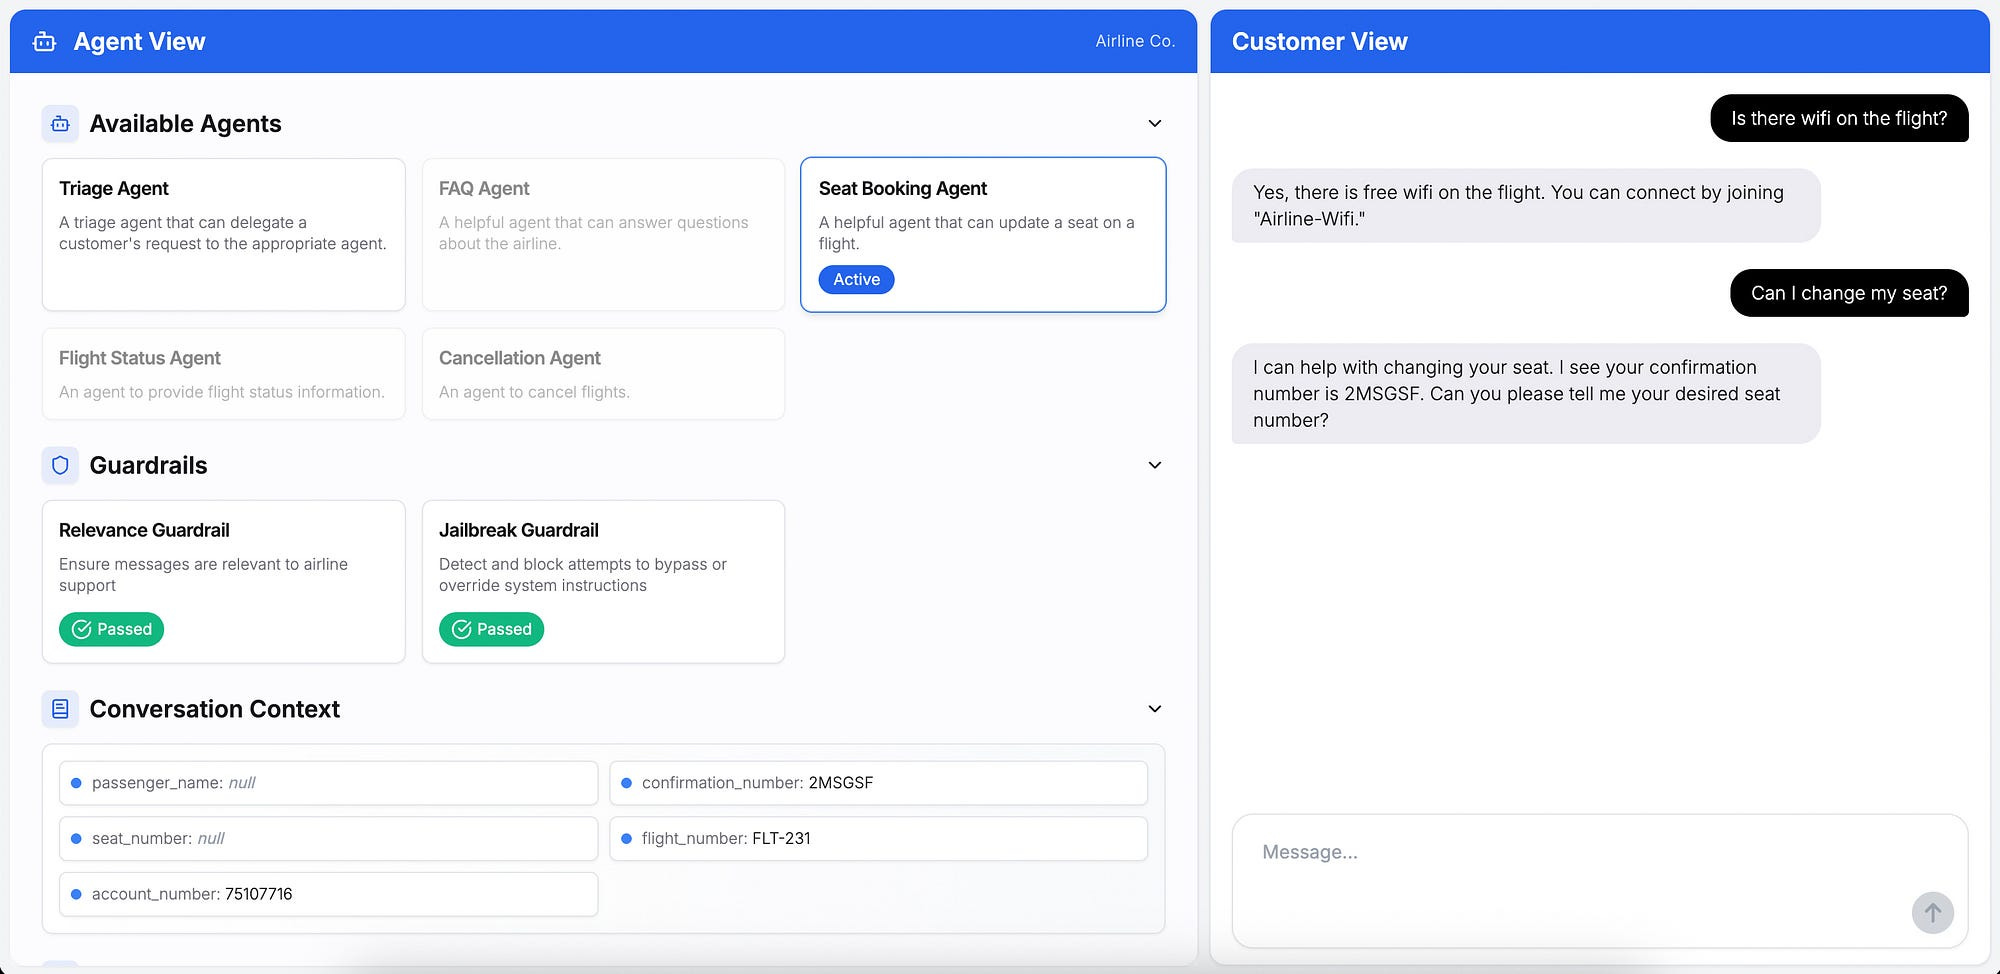
The demo has a web-based conversational UI. It also includes guardrails to ensure safety, keeping conversations relevant and preventing security risks.
The use of the OpenAI Agents SDK enables features like agent handoffs and tracing for monitoring, enhancing reliability.
The demo’s standout features include:
A main triage AI Agent which orchestrates the conversation and routes the conversation the relevant sub-agents.
The ui shows under the available agents heading, which agent is active and currently in use.
Two guardrails are implemented.
With context being managed, which can be seen as a type of memory.
The OpenAI Agents SDK, on which this demo is built, is described as a lightweight, easy-to-use package with few abstractions, upgraded from the previous Swarm framework.
This makes it suitable for building complex, production-ready AI applications.
How It Works: A Practical Example
To illustrate, consider a customer wanting to change their flight seat. They would enter their request via the web UI.
The backend’s initial agent might verify their identity using a database tool, then hand off the task to a specialised agent for seat changes.
This agent would check available seats and process the change, all while guardrails ensure the conversation stays on topic and sensitive information is handled securely.
The tracing feature allows developers to monitor this flow, ensuring reliability and debugging any issues.
The system also includes demo flows for other tasks like cancellations, flight status, and FAQs, providing a comprehensive view of how AI can manage diverse customer service interactions.
The demo also showcases the scalability of the OpenAI Agents SDK, with features like handoffs and tracing enabling complex workflows.
This is especially timely given the current interest in AI-driven solutions, as evidenced by recent developments in AI frameworks and their applications in service industries.
Installing the Agent
I installed the agent by making use of the terminal application on MacOs.
First create a virtual environment:
python3 -m venv agent
Then activate the virtual environment:
source agent/bin/activate
Clone the code repository locally with this command:
git clone https://github.com/openai/openai-cs-agents-demo
Install the dependencies for the backend by running the following commands:
cd python-backend
pip install -r requirements.txt
For the UI, you can run:
cd ui
npm install
To run the application I created two tabs in my terminal window…one for the backend and one for the front-end.
You need to create an environment variable for the API Key:
export OPENAI_API_KEY=your_api_key
Then test it by entering the command:
echo $OPEN_API_KEY
The API key should be displayed to you.
Run the Backend Independently
From the python-backend folder, run:
python -m uvicorn api:app --reload --port 8000The backend will be available at:
http://localhost:8000
Run the Frontend Independently
From the ui folder, run:
npm run devThe frontend will be available at:
http://localhost:3000


Chief Evangelist @ Kore.ai | I’m passionate about exploring the intersection of AI and language. From Language Models, AI Agents to Agentic Applications, Development Frameworks & Data-Centric Productivity Tools, I share insights and ideas on how these technologies are shaping the future.